External hard drive read-only on Mac? Fix it now!

In our daily life, the external hard drive is used more and more frequently. We just plug the external hard drive into the Mac and we can normally read and write the files inside the hard drive. But many users experience problems with external hard drives read-only on Mac while using their computers. You may wonder why your external hard drive is read-only on Mac and how to change external hard drive read-only on mac.
Thank you for reading this post, don't forget to subscribe!Why is my external hard drive read-only on Mac?
There are a number of reasons for external hard drive read-only Mac. The file system you plugged into your Mac’s hard drive is not compatible with the Mac, faulty permission settings, and unexpected formatting error.
NTFS is currently the most frequently used file system because its superior performance. But one of its big drawbacks is that it is not compatible with the Mac operating system. The fact that an external hard drive read-only on a Mac is largely due to the incompatibility between the NTFS file system and the Mac operating system. The next section will mainly show you the solutions to NTFS read-only on Mac.
How to check if an external hard drive is NTFS file system on Mac?
Step 1: Click on Launchpad at the dock of your Mac and choose Other in the menu.
Step 2: Choose Disk Utility among these utilities and open it.
Step 3: When it is launched, click on the external hard drive you have problem with in the left sidebar. You will see an obvious “Windows NT File System” in the right column.
Also Know: Surface pro repair singapore.
Change your NTFS external hard drive read-only on Mac
Solution 1: Using NTFS for Mac
Using NTFS for Mac is the most efficient, safest and most convenient solution to solve the problem of NTFS read-only on Mac. There are paid and free NTFS for Mac software, but these paid solutions can be installed easily. Plus, they have better performance relative to free options. Here we would like to recommend iBoysoft NTFS for Mac. Once you download this tool, you can change your hard drive from read-only on Mac without erasing.
Tutorial to change NTFS-formatted external hard drive Read-only on Mac with iBoysoft NTFS for Mac
Step 1: Download and install iBoysoft NTFS for Mac on your computer, and then restart the Mac.
Step 2: Connect NTFS external hard drive to Mac and launch iBoysoft NTFS for Mac.
Step 3: You can read and write your NTFS files based on the NTFS for Mac.
You can see that this solution is very simple and convenient, and it only takes three steps to change your hard drive from read-only on Mac without erasing.

Solution 2: Enable NTFS read-write with Terminal
Warning: This is a free method but there is a risk of file loss because Apple hasn’t tested mac’s NTFS reading and writing capabilities yet. If you haven’t stored some important data you can have a try.
You can turn on the NTFS file read and write feature that comes with your Mac by changing the command line. The operation method is below:
- Click Go at the upper right of your desktop and go to the Applications > Utilities > Terminal.
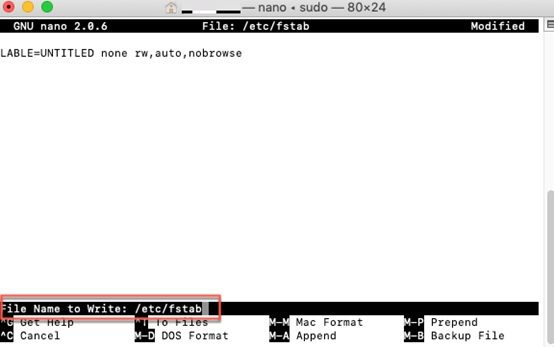
- Input “sudo nano /etc/fstab” to edit the fstab file (supply your password when prompted).

3. Type “LABEL=NAME none ntfs rw,auto, nobrowse” in the editor window for the fstab file. (Be sure to change the word NAME to the name of your drive)

4. Press Control + O to save the file, followed by Control + X to exit.
5. Unmount your NTFS drive and attach it again.
Solution 3: Format this external hard drive
Warning: Formatting your hard drive will cause all the files on your hard drive to disappear, so make sure that the files on your hard drive have been backed up before formatting your hard drive.
You can format your external hard drive into a Mac-compatible file system. APFS, HFS plus, FAT32/exFAT are all accessible on Mac. I recommend formatting your hard drive into exFAT format because it is not only compatible with PC and Mac, but also more powerful than FAT32.
Here are the operate steps:
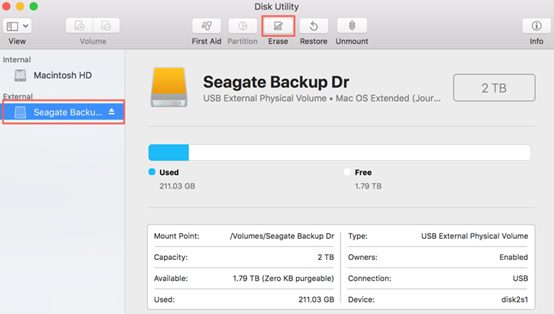
- Insert an external disk. Open Disk Utility in Launchpad. You can also open it by clicking the magnifying glass icon in the upper right corner of the open desktop, and then searching for Disk Utility.
- After opening Disk Utility, you will see a list of available drives on the left. Select the drive you want to format.
- After selecting the device you need to format, click “Erase” at the top.

4. Enter the name of the drive-in “Name” in the pop-up window. The name is best so you can quickly understand the content inside.
5. In the pop-up window, select “ExFAT”.
6. The third option scheme you can choose the default option. When you want to format a partition, there is no scheme option.
7. Click “Erase” in the lower right corner to format the disk.
If your non-NTFS-format external hard drive is plugged into Mac and also read-only, here are some things you can try. When the external hard drive read-only caused by faulty permission settings, you can change the permission of it on Finder. When your external hard drive read-only caused by an unexpected formatting error, you can fix it with First Aid in disk utility without erasing.
Conclusion
Overall, the main reason why is your external hard drive read-only Mac is NTFS file system is incompatible with macOS, faulty permission settings and unexpected formatting. The article provides you with useful solutions to how to change your hard drive from read-only on Mac. I hope this article can help you.
